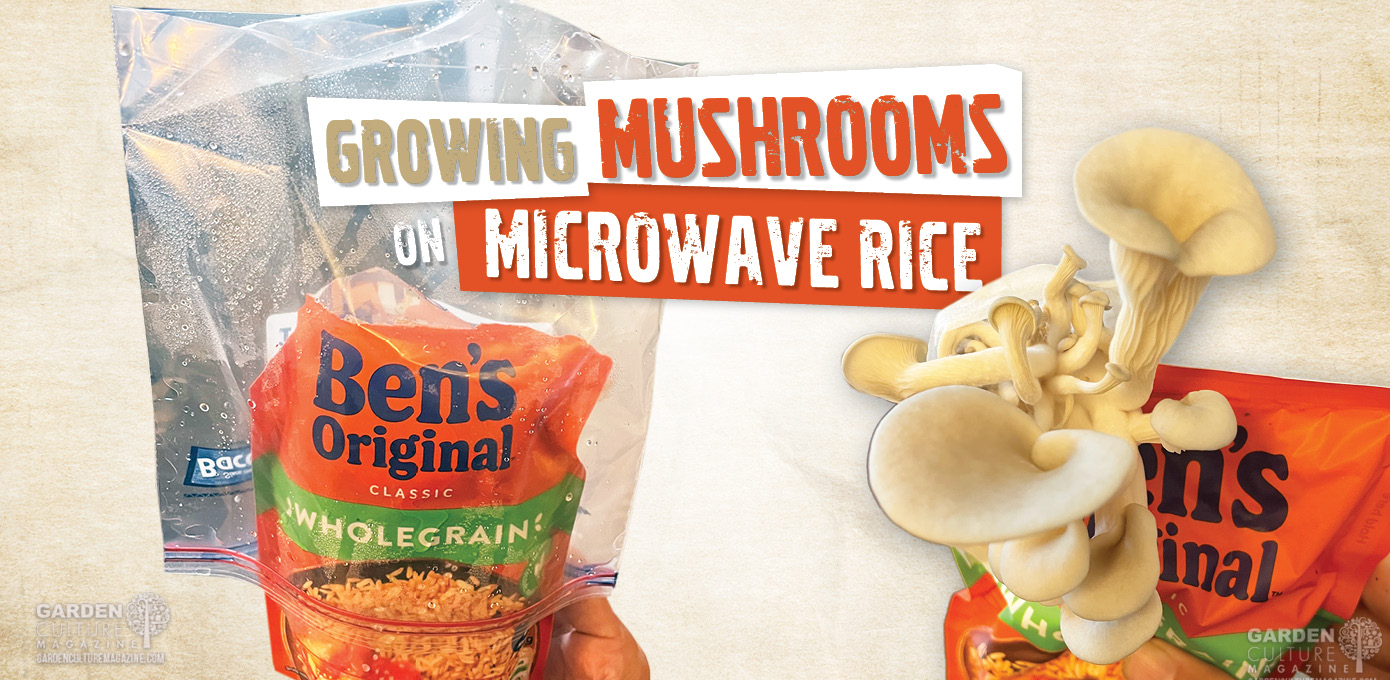
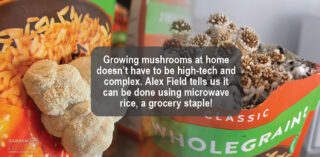
How to Grow Mushrooms on Microwave Rice
Growing mushrooms can seem like a very serious business – all high-tech kit and complicated procedures. Fortunately, many mushrooms – like the delicious oyster, the fancy nootropic lion’s mane and other therapeutic species – will grow happily on pre-cooked microwaveable rice. Let me show you how to use this supermarket staple to produce a range of mushrooms straight from the bag – in as little as five weeks from start to finish. Introducing “Ben’s Tek!”
(This technique was created by a man who calls himself ‘90 Second Mycology’. I humbly thank him for making mushroom growing more accessible to the world.)
How Does it Work?
In “Ben’s Tek,” bags of pre-cooked rice become the ‘soil’ for a fungus to grow in. Mycelium will grow through the rice, and then we can produce a small crop of mushrooms straight from the bag. For bigger yields, mix the rice with other ‘soils’ or substrates in larger containers, where it can act as mushroom ‘seeds’. In this article, we will focus on growing straight from rice bags.
Why Microwave Rice?
When growing at home, mushrooms need a sterile space to start their lives and a warm, moist, and highly nutritious environment to thrive.
Microwaveable rice is already sterile, so your mycelium will have no competition when colonising its new empire (if we can protect our bags from mould invasion!). The rice also has a good texture and moisture content for fungi to thrive.
What Rice to Use?
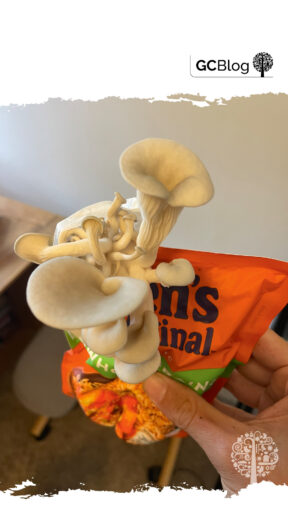
It’s essential to use brown (or ‘wholegrain’) rice, which prevents it from disintegrating into mush. The technique is commonly called ‘Ben’s Tek’ after the famous ready meals company (formerly ‘Uncle Bens’), but other packs work too. Cheaper ‘own brand’ packets can be even better for growing mushrooms than fancy ones. Just make sure your bags have some clear space (usually on the bottom) so you can see what’s happening inside.
What Else Will I Need?
The Underground Phase:
- A ‘spore syringe’ or ‘liquid culture syringe’ for the type of mushroom you want to grow. This is where the original mushroom genetics come from. A quick Google search will find you plenty to choose from.
- A clean place to inject your rice. This can be a clean bathroom floor, a purpose built Still-Air-Box or a laminar flow unit (see “How to Make a Home Mushroom Laboratory” in this issue for more on keeping clean!).
- Alcohol wipes or spray (70% isopropyl alcohol works best).
- Clean scissors.
- “Micropore” tape (breathable medical tape).
- A dark, warm place for ‘colonisation’.
The Overground Phase
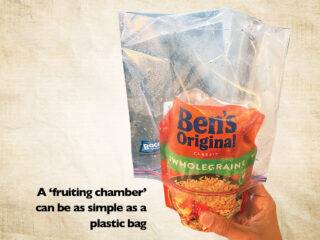
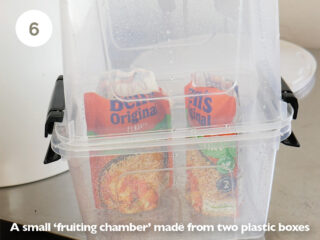
- Two lunchboxes to contain the bags while mushrooms are growing – or a plastic bag to act as a ‘fruiting chamber.’
- A little coconut coir and a kettle if you are growing top-fruiting mushrooms.
- A spray gun of water to keep the mushrooms humid.
How to do it
Inoculating and ‘Colonising’ your Rice Packets
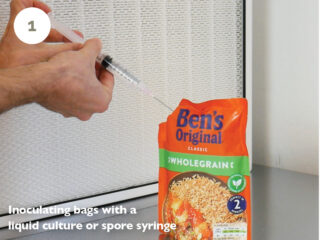
- Gather your rice bags and spore or liquid culture syringe. Put them in your Still-Air-Box or other clean space. Remember that the cleaner you are here, the more successful you are likely to be.
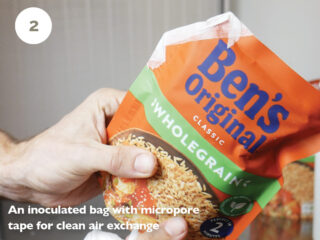
b. Clean your bags, scissors, and hands/wrists with alcohol, and gently chop the top corner off each rice bag. Uncap your syringe and inject 0.5 ml of spore/culture solution into the hole in each bag. If your needle touches anything, hold it in a lighter flame until red-hot to re-sterilise it. - Cover each hole with micropore tape to keep contaminants out while allowing the mycelium some air to breathe.
- Put your bags in a warm, dark place. The ideal temperature is a constant 26°C / 79°F, but a warm airing cupboard can do the job. Leave them here undisturbed to start colonising.
Checking and Massaging your Bags
- After a week or two, you will notice some white mycelium beginning to grow in your bags. Check the bottom of the bag or wherever you can see clearly inside.
- If you see any colours other than white—or if you see sludgy rice—you are growing mould or bacteria. Remove that bag from the others and throw it away so the contamination doesn’t spread to other bags.
- When you see white in the bottom of your bags, massage them gently to break up clumps and redistribute the mycelium. Be careful not to touch the micropore tape with the rice or your fingers while you do this! Massage your bags again a week or so later when you see a thicker layer of mycelium starting to form.
- After three to five weeks (depending on your temperatures and other conditions), your bags should be fully colonised—solid white blocks of rice!

Preparing for the Fruiting Stage
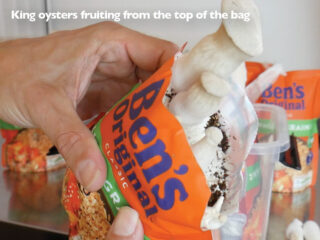
Fruiting from the bag – ‘Top-fruiting’ mushrooms (like king oyster, chestnut or other therapeutic mushrooms)
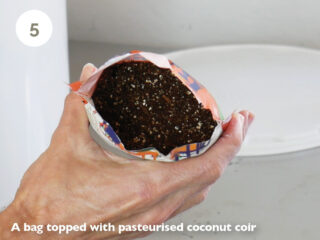
- Pour boiling water over a little coconut coir to hydrate and pasteurise it. When cool, gently squeeze out the excess water.
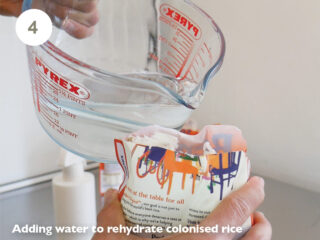
- Tear off the top of the rice bag and fill it with tap water. Leave it for a few hours to rehydrate the rice, and then drain.
- Massage the top layer of rice through the bag to make a flat surface for growing mushrooms.
- Add a thin layer of pasteurised coconut coir to the top of the bag and flatten it gently out. Wipe the inside of the top of the bag to keep things clean.
OR… Fruiting from the bag – ‘Side-fruiting’ mushrooms (like regular oyster and lion’s mane)
- Cut an ‘X’ shape, a few inches long, on the side of each colonised bag. Make sure to use a clean blade.
- Put the whole bag in a bowl of water to soak for a few hours. Drain.
Growing Mushrooms!
- Create a humid environment for your bag. Place another (clear) bag on top of it or put it inside a lunchbox ‘dome’. This will be your makeshift ‘fruiting chamber’—you can make a purpose-built one later if you catch the growing bug!
- Spray the inside of your ‘fruiting chamber’ a few times daily with your water gun on a fine mist setting. When you do this, waft your bags with a book to bring fresh air into the growing environment.
- Pretty soon, you’ll see baby mushrooms appear. Keep wafting and spraying until they’re ready to harvest (the mushroom caps will start breaking away from their stems when it’s time to pick).
Harvest
- For most mushrooms, grabbing and twisting them gently will work well to pick them with minimal damage to the surface of the bags.
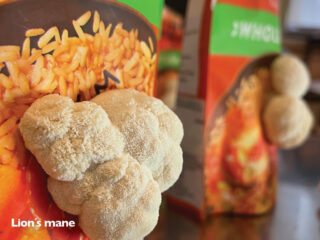
- If you need to cut your mushrooms (like if you are growing lion’s mane), cut as close as possible to the bag or soil surface.
Getting More Mushrooms
- Fill your bags with water again – or soak them in a bucket of water for a few hours. Drain.
- Put your bags back into ‘fruiting’ conditions. You should get another ‘flush’ or two of mushrooms over the coming weeks!
What Will You Grow?
Using this method, I have successfully cultivated blue oyster, king oyster, lion’s mane, and chestnut mushrooms. Other medicinal varieties can also work well. I am sure more is possible, so get creative and see what you can grow!
See Alex’s online course on using rice to grow mushrooms here.